
version 0.8.5 and later
Assigning Vertices to Bones
First select some vertices.
Then click the 'Assign Selected Vertices to Bone' button  in the toolbar. This will display
the following dialog.
in the toolbar. This will display
the following dialog.
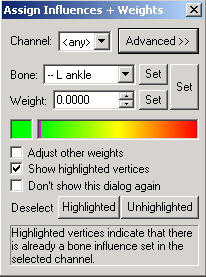
The 'Channel' combo box selects the index of the weight to assign. This can be 1, 2, 3, 4 or any. When any is selected and a bone
assignment is made by click the 'Set' button the assignment will be placed into the first free channel of each vertex. Since it is assumed
that weight totals will be equal to 1.0 the 4th channel will automatically be assigned a weight of 1.0 - (weight1 + weight2 + weight3).
If your model requires weight totals other than 1.0 then you should not use the 4th channel.
'Bone' shows the primary bone selection from the 3d view. This value can be changed by selecting a bone in the skeleton tree or using
the 'Select Bone' tool in the 3d view. Selecting the skeleton will set this value to '(none)'. Click the adjacent 'Set' button will apply
the bone assignment to the selected vertices in the index chosen by 'Channel'.
'Weight' changes the weighting value that will be set into the selected vertices. Clicking the adjacent 'Set' button will apply the
weight to the selected vertices in the index chosen by 'Channel'. Clicking and dragging in the color strip will also apply changes to the
weight values of the selected vertices immediately.
NOTE: Clicking the larger 'Set' button will apply both the bone assignment and the weight to the selected vertices.
When 'Adjust other weights' is checked, applying changes to weight values will update any other weight values in each vertex
proportionately such that the weight total will equal 1.0. (e.g. if a vertex has weight values of { weight1=0.5, weight2=0.4, weight3=0.1 }
and weight1 is changed to 0.25, weight2 would be changed to 0.6 and weight3 would be changed to 0.15)
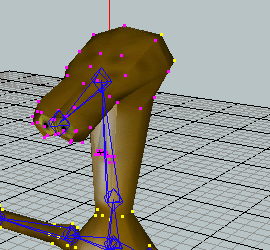
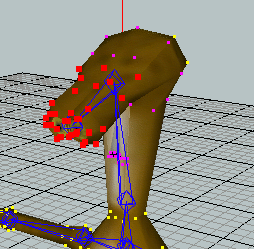
When 'Show Highlighted Vertices' is checked any vertices currently assigned to the selected channel are drawn larger than normal
using the color of the current value in the Weight field. The following image shows an example of how the highlighted vertices look.
When you check the 'Don't show this dialog again' checkbox and close the dialog, assigning vertices in the future will only use 1
weight and this dialog will be bypassed. If you ever want to reenable this dialog, from the menu click Edit/Edit Preferences..., click
the Edit node and change the 'VertexWeights' value to 4.
Clicking the 'Deselect unhighlighed vertices' button will do exactly as it says.
Clicking the 'Advanced' button will show you additional options for narrowing down which selected vertices to modify. When in
advanced mode and any of the check boxes are checked, changes made to the bone assignment or weight will only be applied to the
highlighted vertices.
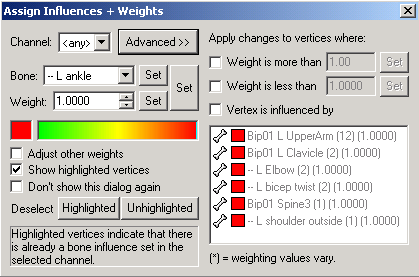
When 'Weight is more than' is checked only the vertices in the selected channel whose weight is more than the adjacent value
will be highlighted. To change the minimum value enter the new value and click the adjacent 'Set' button.
When 'Weight is less than' is checked only the vertices in the selected channel whose weight is less than the adjacent value
will be highlighted. To change the maximum value enter the new value and click the adjacent 'Set' button.
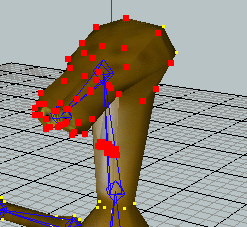
When 'Vertex is influenced by' is checked, only vertices assigned to the bone selected in the list box will be highlighted.
The following image illustrates how the model would look if the head were selected in the list box above.
Copyright © 2006-2007 Fragmosoft