version 0.8.5 and later
UV Mapper
From the main menu click Texture/UV Unwrapper

Menu
- Edit
- Hide Selection - hides the selected uv coords
- Hide Unselected - hides all unselected uv coords
- Invert Hidden - toggles the visible state of all uv coords
- Unhide All - shows all hidden uv coords
- Reverse Winding Order - reverses the winding order of all selected uv triangles
- Snap Together - moves all selected uv coords to the center of the smallest rectangle that encloses the selection
- Weld Selection - if any of the selected uv coords are closer than the weld epsilon they will be made equal
- Weld All - if any of the uv coords are closer than the weld epsilon they will be made equal
- Create Material With Outlines - creates a new material and texture. The texture will contain a snapshot of all the uv triangle outlines and optionally the texture background.
NOTE the texture image will only contain the uv coords that are between 0 and 1 in both the u and v direction
- Select
- Select All - selects all uv coords
- Invert Selection - toggles the selection state of all uv coords
- Deselect All - deselects all uv coords
- Expand Selection - selects all uv triangles that are bordering the selected uv triangles
- Contract Selection - deselects all uv triangles that are on the border of the selection
- Grouping
- Transform
- Flip - flips the selection horizontally or vertically across the center of the selection rectangle
- Mirror - flips the selection horizontally or vertically across the given edge of the selection rectangle
- Move
- Rotate
- Scale
- Mapping
- Planar - projects the selected uv coords into the chosen plane
- Cylindrical - unwinds the selected uv coords around the chosen axis
- Spherical - unwraps the selected uv coords using the chosen axis as the starting point
- View
- Zoom Extents - centers all the uv coords in the view and zooms in so that it fills the window
- Zoom Selection Extents - centers the selection in the view and zooms in so that it fills the window
- Zoom - sets the zoom factor to a specific value
- Snap To Grid - enables/disables snapping the selection to the grid points when moving with the mouse
- Snap Angles - enables/disables snapping of angles when rotating the selection with the mouse
- Show Grid - toggles whether or not the grid points are visible
- Show Texture Background - toggles whether or not the selected texture is displayed as the background
- Show Tiled Texture - toggles whether or not the selected texture background is drawn once or across the entire window
- Filter Selected Faces - when checked, only faces which are selected on the mesh in the 3d view will be shown in the UV Mapper, otherwise all faces will be shown
- Settings

- Select UV Coords - sets the current mode to select vertices
- Select UV Triangles - sets the current mode to select triangles
- Pan - sets the current mode to allow moving the canvas
- Zoom - sets the current mode to allow zooming in and out from the canvas
- Zoom Region - sets the current mode to allow drawing a rectangular region to zoom in to
- Zoom Selection Extents - centers the selection in the view and zooms in so that it fills the window
- Zoom Extents - centers all the uv coords in the view and zooms in so that it fills the window
- Show Only Selected Faces - when pressed, only faces which are selected on the mesh in the 3d view will be shown in the UV Mapper, otherwise all faces will be shown
- Lock Selected Coords - toggles whether or not the selected uv coords are locked in place
- Expand Selection - selects all uv triangles that are bordering the selected uv triangles
- Shrink Selection - deselects all uv triangles that are on the border of the selection
- Show Grid - toggles whether or not the grid points are visible
- Snap To Grid - enables/disables snapping the selection to the grid points when moving with the mouse
- Snap Angles - enables/disables snapping of angles when rotating the selection with the mouse

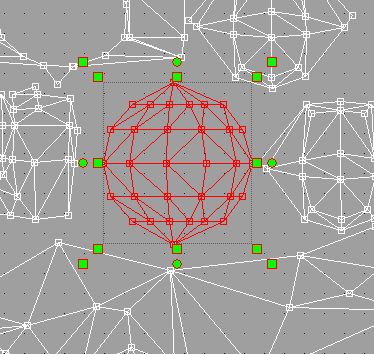
When uv coords are selected they will be displayed using the designated selection color from the settings dialog. There will also be a rectangle drawn to fit around all the selected coords and around this rectangle will be several handles. Each handle performs a different function when clicked and dragged. Round handles will rotate the selection. Square handles will scale the selection. The square handles on the outer corners perform a uniform scale (scales both u and v equally). There are also invisible handles running along each edge of the rectangle that will allow the selection to be moved either left and right or up and down. Clicking the middle of the rectangle will allow moving the selection freely in any direction. When the mouse is moved over any of these areas the cursor will change appropriately.
NOTE that when you try to select coords that are within the selection rectangle you will end up moving the selection. To get around this you can hold control while selecting items to toggle the selection state of uv coords and triangles or hold shift to add them to the selection.

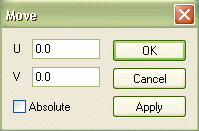
Moves the selected uv coords by the amount given in the 'U' and 'V' edit boxes when the 'OK' and 'Apply' buttons are clicked. When 'Absolute' is checked the selection will be moved such that the top left corner of the selection rectangle is located at the values given in the 'U' and 'V' edit boxes. The 'U' and 'V' values are given in uv space.

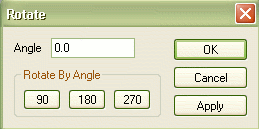
Rotates the selected uv coords by the given angle when the 'OK' and 'Apply' buttons are clicked. The angles are in degrees.

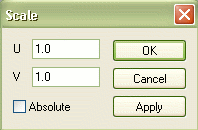
Scales the selected uv coords by the amount given in the 'U' and 'V' edit boxes when the 'OK' and 'Apply' buttons are clicked. When 'Absolute' is checked the selection will be scaled such that the width and height of the selection rectangle equal the values given in the 'U' and 'V' edit boxes. The 'U' and 'V' values are given in uv space.
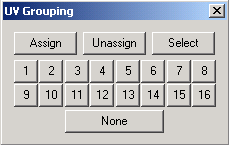
UV coords can be grouped to easily recall a particular selection. There are 2 ways to assign and select uv groups as shown in figure 1 and figure 2.
To assign a uv group select a set of uv coords, click the Select/Grouping menu item, click the 'Assign' button, then click the number of the group. This will add the selected coords to that group. To recall the selection click the 'Select' button, then click the number of the group.
To remove uv coords from a group, click the 'Unassign' button and the group number. Choosing 'none' when the Assign button is depressed will clear the uv group assignments from the selected coords. Choosing 'none' when the Select button is depressed will deselect all uv coords. UV coords can be assigned to any or all of the uv groups.
NOTE: when selecting uv groups you can hold the control key to toggle the selection state of the coords in the chosen group. Holding the shift key will add the coords in the chosen group to the selection.

The texture background can be selected from the combo box at the bottom of the dialog.

Whenever only one uv coord is selected or all selected uv coords are closer to each other than the weld epsilon the u and v edit boxes will be enabled. Entering a u and v value then pressing the adjacent 'Set' button will move all the selected uv coords to the given coords in uv space.

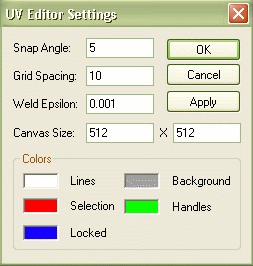
'Snap Angle' - sets the angle increment when rotating uv coordinates.
'Grid Spacing' - sets the distance in texels between grid points.
'Weld Epsilon' - sets how close 2 uv coordinates need to be in uv space in order to be welded.
'Canvas Size' - sets the width and height of the canvas. This is only used when there is no texture set as the background.
Colors
'Lines' - sets the color of unselected lines and vertices.
'Selection' - sets the color of selected lines and vertices.
'Locked' - sets the color of lines and vertices whose positions have been locked.
'Background' - sets the color of the background.
'Handles' - sets the color of the handles drawn around the selection.
Definitions
Texel - a pixel in a texture image
UV Space - values typically range from 0 to 1
Copyright © 2006 Fragmosoft
